Using the LEDs
Applies to:
All variants
The VBOX Touch, Performance Box Touch and MFD Touch all have 4 high brightness RGB LEDs that can be controlled via Python.
RGB means Red, Green, Blue, and each LED consists of a Red, Green and Blue LED that can be set to different brightnesses independently to give over 16 million different hues of colour.
Each LED can be controlled independently by calling one function in the vts python module.
Before configuring the LEDs you must first import the module into your Python program by calling:
import vts
The function to illuminate the LEDs takes 12 values, 3 for each LED which represents the Red, Green and Blue values for that LED. Each value is a number between 0 and 255. The LEDs will then remain in this state until the function is called again.
The LEDs are addressed from left to right.
For example, to just illuminate the first LED (the far Left LED) red with full brightness you would write:
vts.leds(255,0,0,0,0,0,0,0,0,0,0,0)
For green you would write:
vts.leds(0,255,0,0,0,0,0,0,0,0,0,0)
For blue:
vts.leds(0,0,255,0,0,0,0,0,0,0,0,0)
To turn all the LEDs off the function would be called with all values set to zero:
vts.leds(0,0,0,0,0,0,0,0,0,0,0,0)
If you wanted to illuminate all 4 LEDs in full brightness red you would write:
vts.leds(255,0,0,255,0,0,255,0,0,255,0,0)
Adjusting brightness
The value passed to each colour is its brightness, on a scale from 0-255, so setting a value of 127 the LED will be at half brightness, 255 would be full brightness and 0 would be off.
Mixing Colours
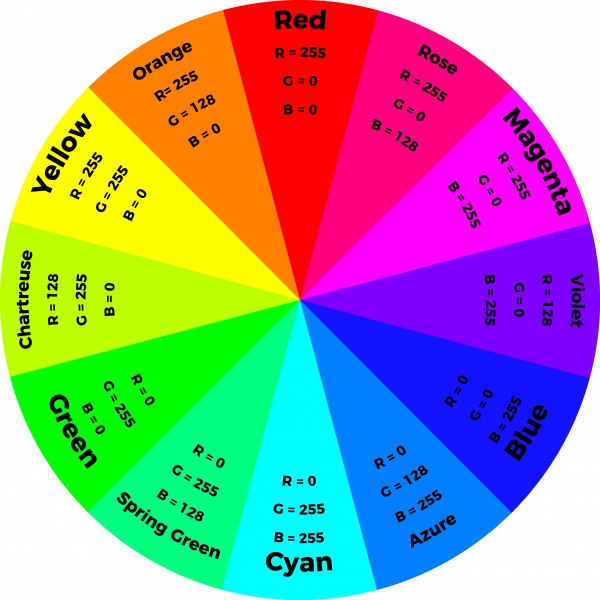
Over 16 million different hues can be created by varying the brightness of the 3 colours in the LEDs, some basic colours are:
Colour |
Red value |
Green value |
Blue value |
|---|---|---|---|
Red |
255 |
0 |
0 |
Green |
0 |
255 |
0 |
Blue |
0 |
0 |
255 |
Magenta |
255 |
0 |
255 |
Cyan |
0 |
255 |
255 |
Yellow |
255 |
255 |
0 |
Orange |
255 |
128 |
0 |
Violet |
128 |
0 |
255 |
Using a list to control LEDs
In addition to passing 12 parameters to the LEDs function you can also pass a list using positional arguments, this can be useful if your code wants to only modify the state of a single LED at once, or if you wish to use the same colour on each LED, it also provides a shorthand way of turning all the LEDs off.
You can pass a list to the function as in the example below:
leds[0]=0
leds[1]=0
leds[2]=0
leds[3]=0
leds[4]=0
leds[5]=0
leds[6]=0
leds[7]=0
leds[8]=0
leds[9]=0
leds[10]=0
leds[11]=0

vts.leds(*leds)
You could create a list for each of the LED states you wish to use and then just call them when required, for example:
yellow = [255,255,0,255,255,0,255,255,0,255,255,0]
blue = [0,0,255,0,0,255,0,0,255,0,0,255]

vts.leds(*yellow)
or construct the list dynamically, like in the example below which will turn off all the LEDs by creating and passing a list of 12 zero values:
vts.leds(*([0] * 12))
If you wished to use the same colour on each LED you could repeat the list 4 times. For example, to set all the LEDs to cyan:
cyan = [0,255,255]

vts.leds(*(cyan*4))
If you wished all four LEDs to be the same colour but wanted to control the r,g,b elements independently you could write code as follows:
r=0
g=0
b=0

vts.leds(*[r,g,b]*4)
Using delays for effects
Using the vts.delay function you can create effects by changing the LEDs over time, the example below illuminates the LEDs in turn in a white flourish
def flourish_leds():
   v = [int(255 * math.exp(-i * .0625)) for i in range(90)]
   for i in range(150):
      a = v[i] if i < 90 else 0
      b = v[i - 20] if 20 <= i < 110 else 0
      c = v[i - 40] if 40 <= i < 130 else 0
      d = v[i - 60] if 60 <= i else 0
      vts.leds(a, a, a, b, b, b, c, c, c, d, d, d)
      vts.delay_ms(3)

flourish_leds()

Example
The following example creates random colours on the LEDs that can be started and stopped using the button on the screen:
def button_cb(b):
   global leds_on
   if leds_on == True:
      leds_on = False
   else:
      leds_on = True

def main():
   global leds_on
   leds_on = True
   button = [gui.CTRL_BUTTON, 300, 140, 200, 200, 30, "TOGGLE LEDS", button_cb]

   gui.show([button])

   while True:
      if leds_on == True:
            led_cols = []
            for x in range(0, 12):
               # Uses the rand32 function from vts which returns a random 32-bit number.
               # As LEDs can have a max value of 255 this needs to be modulo (%) 256.
               led_cols.append(vts.rand32()%256)

            vts.leds(*led_cols)
      else:
            vts.delay_ms(100)

if __name__ == '__main__':
   main()
Further Examples
The following examples are available as part of the example scripts provided that all feature use of the LEDs:
Dashboard - This script is of a vehicle dashboard with gauges and shift lights demonstrating complex graphic elements and reading/displaying CAN and GNSS data as well as LED control with fading effects.
Game - A reaction-based game demonstrating the use of the UI, timers and LEDs
LEDs - An example script that allows the colour of the LEDs to be set by moving sliders on the screen
Event Marker - Example of an app with customisable colouring of buttons that match that of the LED colour when pressed and also with a night mode that dims both the colours automatically as well.
Torque Display - Example of a fully featured application with lots of UI, examples of writing to the SD card, displaying data and reading data over CAN.
VPRS - Example of a complete application that works with Racelogic’s VBOX Precision Ranging System, this demonstrates UI design, serial and CAN data collection, custom fonts and images, swiping of the UI, LED control and file writing.