Using the CAN Bus
Applies to:
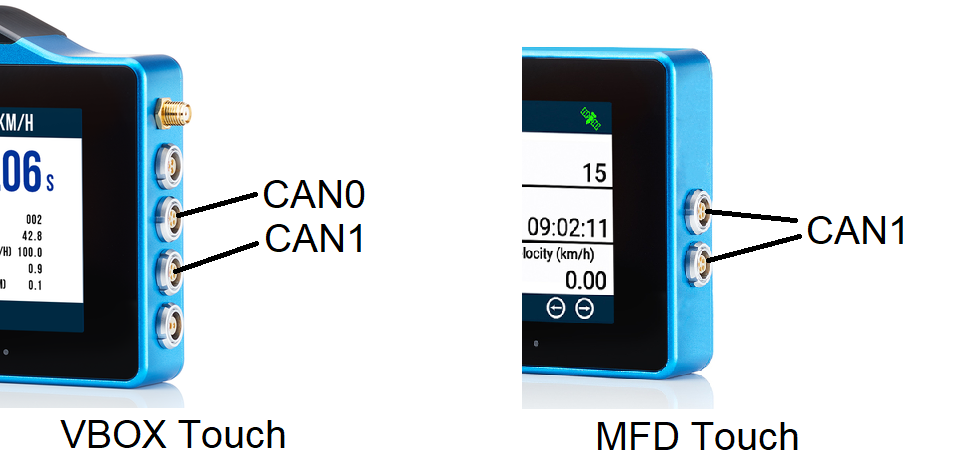
VBOX Touch and MFD Touch variants only
The VBOX Touch has two dedicated CAN Bus connections on board, these can be configured and used independently. All the functions of the CAN Module can be found in the CAN Module Reference.
The two connectors shown here are known internally as CAN0 and CAN1. Anywhere in the examples or tutorials that can.CAN0 is referenced this can be replaced by can.CAN1 if you wish to perform the action on CAN1 instead of CAN0
Note
The MFD Touch only has one CAN bus that is connected to both connectors, this is CAN1.
The CAN Bus controllers allow for the transmission and reception of CAN 2.0B frames, if you are unfamiliar with CAN Bus see the Further Reading section below for some external links to information on CAN.
Physical Connection
As shown above, the 2-wire CAN bus is available on Racelogic’s 5-way LEMO connector, for the pinout click here. Various cables are available for connection and include the following:
5-way LEMO to 5-way LEMO (RLCAB005-C) this is used to connect between VBOX products for CAN communication and power, available in various lengths - Datasheet here
5-way to un-terminated wires (RLCAB015L) this will bring out power, CAN and serial to bare wires, available in various lengths - Datasheet here
5-way to OBD (RLCAB069L) this cable is used to connect to the CAN connection on the OBD port of a vehicle, available in various lengths - Datasheet here
5-way to DB9 (RLCAB019L) this cable is useful to connect to a CAN device with a standard DB9 pinout for CAN (pins 2 and 7), available in various lengths - Datasheet here
If you wish to split the CAN output into multiple connectors or wish to separate the serial and CAN connections from the 5-Way LEMO this can be achieved with the Racelogic CAN Splitter (RLVBACS024) - Datasheet here
Configuring the CAN Bus
Before configuring the CAN bus you must first import the module into your Python program by calling:
import can
To configure a CAN bus you must complete a few steps.
First, reset the CAN bus you are using to the desired baud rate. For example, to reset bus 0 to 500kbps you would call:
can.reset(can.CAN0, 500000)
For CAN bus 1 to 1mbit you would call:
can.reset(can.CAN1,1000000)
Decide if you need the 120Ω CAN termination resistor to be enabled, it is disabled by default but to turn it on you must call:
can.termination(can.CAN0, True)
If you wish to receive CAN data you must then configure your receive filters and a callback for messages received.
See the section Filtering CAN Frames for information on configuring the filters but to configure the filters to receive all CAN messages on the bus call the following:
can.add_rx_id(can.CAN0,0,0)
To configure the callback to be called once a message is received call the following where can0_cb is the name of your callback function:
can.set_callback(can.CAN0, can0_cb)
Once this has been set the function can0_cb will be called each time a can frame that matches the filter is received on that bus. See Receiving a CAN frame for more information.
Finally to enable the CAN bus to send and receive it must be taken out of test mode by calling:
can.test_mode(can.CAN0, 0)
Sending a CAN frame
To send a CAN frame after configuring the bus then the function can.send_msg must be called. This function takes the bus you wish to transmit on, the CAN ID, and the data. In addition, this is used to request a remote frame if your bus supports it, in most cases this is not used so should be set to 0.
An example of this would be:
can.send_msg(can.CAN0,[0x300,0,[0x01,0x02,0x03,0x04,0x05]])
This would send a 5-byte CAN message with an ID of 0x300 on CAN bus0 without the remote frame bit set, the contents of that message being 0x01,0x02,0x03,0x04,0x05
Note
CAN only allows messages up to 8 bytes in length to be transmitted and received.
CAN IDs should either be standard (11-bit) or extended (29-bit), to send an extended 29-bit identifier then bit 30 of the id must be set.
For example to send an extended CAN ID of 0x900 then you must send 0x40000900 (if you wish to set bit 30 add 0x40000000 to the CAN ID you wish to send)
A simple function to set this bit for you is shown below, simply pass it your extended id and it will return the id with bit 30 set:
def set_extended(ID):
    return ID | (1<<30)
As an example, the following would send 8 bytes to CAN ID 0x900
can.send_msg(can.CAN0,[0x40000900,0,[0x08,0x07,0x06,0x05,0x04,0x03,0x02,0x01]])
Receiving a CAN frame
To receive a CAN frame you must first set up the filters when initialising the bus, see Configuring the CAN Bus above or Filtering CAN Frames below.
The most convenient way to receive CAN messages is to set up a callback function that is called every time a message is received on the bus you are interested in, this is set up when you configure the CAN bus (see Configuring the CAN Bus above)
To then retrieve the latest message(s) while within the callback use:
can.get_msg(can.CAN0)
This will return a CAN message. To be sure that no CAN messages are missed this should be called continually until the function returns None to indicate no more messages on the bus.
An example of the callback with the get_msg could be:
def can0_cb():
 while True:
     can_msg = can.get_msg(can.CAN0)
     if can_msg is None:
         return
     if can_msg.id  == 0x300:
         print('0x300 CAN Message received')
The CAN message object is returned as an attribute tuple with the following elements:
id [int]: the 11-bit or 29-bit CAN ID of the message received
msgnum [int]: message object number
msglost_ctrlr [bool]: did this message overwrite a previously unrecovered message in the CAN controller?
msglost_buffer [bool]: did this message overwrite a previous unrecovered message in the message queue?
data [list of ints]: the data bytes received in a list (up to 8 bytes)
msgnum, msglost_ctrlr and msglost_buffer can be used to keep track of messages received and signal if messages are getting lost but in most cases do not need to be used.
If a callback is not used, all the messages are not pulled from the bus or can.get_msg is not called frequently enough on a busy bus then CAN messages may be lost, consider using Filtering CAN Frames, which is shown below, to minimise this risk.
Filtering CAN Frames
Your application is likely only interested in receiving certain messages on the CAN bus, in which case you may want to filter the incoming messages to avoid having to process all messages and reduce the chance of messages being missed. For example, if you were only interested in CAN id 0x300 you could do the following:
can.add_rx_id(can.CAN0,0x300)
This would set up the filters such that only messages with the CAN id 0x300 would be received, and all other messages would be filtered out.
To stop listening on an id call:
can.del_rx_id(can.CAN0,0x300)
In addition, to apply a filter by specifying a mask and value for example to listen to any message from 0x300 to 0x3FF, apply the following:
can.add_rx_id(can.CAN0,0x300,0x700)
The second parameter is the mask value to check against.
To receive all CAN frames you must send:
can.add_rx_id(can.CAN0,0,0)
All filters are cleared when can.reset() is called.
Example
The example below will setup both CAN buses, setup callbacks to listen on both CAN Ports and display received CAN data on the screen:
import can
import gui

value1 = ['----']
value2 = ['----']
value3 = ['----']
value4 = ['----']

# This callback is called every time the screen refreshes (60Hz)
def vsync_cb(l):
   gui.redraw()

# Helper function to convert bytes to an int
def bytes_to_int(bytes):
   result = 0
   for b in bytes:
      result = result * 256 + int(b)
   return result

# Function to process the CAN data
def handle_can(bus):
   while True:
     can_msg = can.get_msg(bus)
     if can_msg is None:
         return
     if can_msg.id == 0x301:
         value1[0] = "{:02}".format(can_msg.data[0])
     elif can_msg.id == 0x302:
         value2[0] = "{:06.2f}Km/h".format(bytes_to_int(can_msg.data[4:6])*0.0182)
         value3[0] = "{:06.2f}".format(bytes_to_int(can_msg.data[6:])*0.01)
     elif can_msg.id == 0x303:
         value4[0] = "{:06.2f}m".format(int.from_bytes(bytes(can_msg.data[:3]), "big", True)*0.01)

# This callback is called every time a CAN message is received on CAN0
def can0_cb():
   handle_can(can.CAN0)

# This callback is called every time a CAN message is received on CAN1
def can1_cb():
   handle_can(can.CAN1)

# Main #########################################################################
def main():
   # Initialization of CAN0 at 500kbps ########################################
   can.reset(can.CAN0, 500000)
   # Set up CAN callback for CAN0 to call function can1_cb
   can.set_callback(can.CAN0, can0_cb)
   #Turn on Termination for CAN0
   can.termination(can.CAN0, True)
   #Listen on all ids on CAN0
   can.add_rx_id(can.CAN0,0,0)
   # Disable CAN test mode for CAN0
   can.test_mode(can.CAN0, 0)

   # Initialization of CAN1 at 500kbps ########################################
   can.reset(can.CAN1, 500000)
   # Set up CAN callback for CAN1 to call function can1_cb
   can.set_callback(can.CAN1, can1_cb)
   #Turn on Termination for CAN1
   can.termination(can.CAN1, True)
   #Listen on specific ids only (0x301-0x303)
   can.add_rx_id(can.CAN1, 0x301)
   can.add_rx_id(can.CAN1, 0x302)
   can.add_rx_id(can.CAN1, 0x303)
   #Disable CAN test mode
   can.test_mode(can.CAN1, 0)

   # List of items to pass to the gui
   gui_l = [
      [gui.EVT_VSYNC, vsync_cb],
      [gui.DL_SAVE_CONTEXT()],
      [gui.DL_CLEAR_COLOR_RGB(0, 41, 66)],
      [gui.DL_CLEAR(1, 1, 1)],
      [gui.DL_SCISSOR_SIZE(800, 350)],
      [gui.DL_SCISSOR_XY(0, 65)],
      [gui.DL_CLEAR_COLOR_RGB(255, 255, 255)],
      [gui.DL_CLEAR(1, 1, 1)],
      [gui.DL_RESTORE_CONTEXT()],
      [gui.DL_COLOR_RGB(255, 255, 255)],
      [gui.CTRL_TEXT, 30, 7, 31, 0, 'CAN Display Example'],
      [gui.DL_COLOR_RGB(0, 0, 0)],
      [gui.CTRL_TEXT, 200, 90, 31, gui.OPT_CENTERX, 'Satellites'],
      [gui.CTRL_TEXT, 200, 160, 32, gui.OPT_CENTERX, value1],
      [gui.CTRL_TEXT, 600, 90, 31, gui.OPT_CENTERX, 'Speed'],
      [gui.CTRL_TEXT, 600, 160, 32, gui.OPT_CENTERX, value2],
      [gui.CTRL_TEXT, 200, 270, 31, gui.OPT_CENTERX, 'Heading'],
      [gui.CTRL_TEXT, 200, 340, 32, gui.OPT_CENTERX, value3],
      [gui.CTRL_TEXT, 600, 270, 31, gui.OPT_CENTERX, 'Altitude'],
      [gui.CTRL_TEXT, 600, 340, 32, gui.OPT_CENTERX, value4],
   ]
   gui.show(gui_l)

if __name__ == '__main__':
   main()
Further Examples
The following examples are available as part of the example scripts provided that all feature use of the CAN module:
CAN Display - This is an example script demonstrating reading data from the CAN bus and displaying it on the screen.
Dashboard - This script is of a vehicle dashboard with gauges and shift lights demonstrating complex graphic elements and reading/displaying CAN and GNSS data as well as LED control.
Serial Scales - Example of an application that takes in data over the serial port and displays it on the screen whilst also outputting the data over CAN.
Torque Display - Example of a fully featured application with lots of UI, examples of writing to the SD card, displaying data and reading data over CAN.
VPRS - Example of a complete application that works with Racelogic’s VBOX Precision Ranging System, this demonstrates UI design, serial and CAN data collection, custom fonts and images, swiping of the UI, LED control and file writing.