Screen Framework
The Screen Framework has been created in order to make it simpler to create and manage screens and buttons on the display.
Screen Manager
This is the base for the screens. It manages all Screen objects and allows you to easily switch between them. It operates as a singleton and is used by importing ScreenManager from the screen_utils module.
It has 2 functions that are primarily used:
Add_Screen = Stores a Screen object in a dictionary.
Set_Screen = Sets the display to be the Screen objects gui_list.
It also stores the last screen so you can use this to revert back a screen from a settings page for example:
ScreenManager.Set_Screen(ScreenManager.last_screen)
ScreenManager.switch_to_last_screen()
Either of these can be used to revert back a screen.
Screen object
The Screen class is there to be inherited by your screen class. This will provide the base for you to build off of. There are already a few pre-defined Screen classes. These are:
ScreenBase = Inherit this for a default header with a colour you can customise and a title that can be set with text of your choice.
ScreenValue = This Screen is different. It is configurable but should not be inherited. See Screen Value for more details.
Creating a screen
To create a screen you need to make your own class inheriting from one of the Screen objects and then add it to the ScreenManager
from screen_utils import ScreenManager
from screen_base import ScreenBase

class MyNewScreen(ScreenBase):
    def __init__(self):
        super().__init__()
        self.set_title('MY NEW SCREEN')


def main():
    ScreenManager.Add_Screen(MyNewScreen, 'THE_NEW_SCREEN', True) # The True at the end states that this is the start screen

if __name__ == '__main__':
    main()
This will display a screen with the title “MY NEW SCREEN” in the top left and the normal Racelogic dark blue header and footer.
Screen Graph
This a base screen for you to inherit from. It in turn inherits from ScreenBase so will keep all functionality from this.
When you inherit from the graph screen you need to make sure you pass it all the parameters for when it creates a new object instance. These are:
y_divisions[int] = The amount of division markers that appear on your y axis. This has to be either a power of 2 or divisible by 5. This can be changed manually while on the screen using set_marker_divisions().
y_min[float/int] = The minimum value that your y value can be.
y_max[float/int] = The maximum value that your y value can be.
width[int] = The width of your graph. Defaults to 600
height[int] = The height of your graph. Defaults to 300.
origin_coords[list of 2 ints] = The coordinates of the origin of your graph. Defaults to [100,380].
page_title[str] = The title of your page. Defaults to a blank string ‘’.
y_title[str] = The y axis title. Defaults to a blank string ‘’.
from screen_graph import ScreenGraph

class MyGraphScreen(ScreenGraph):
    def __init__(self):
        super().__init__(5, 0, 40, width=500, height=300, origin_coords=[100,380], page_title='GRAPH', y_title='SPEED')
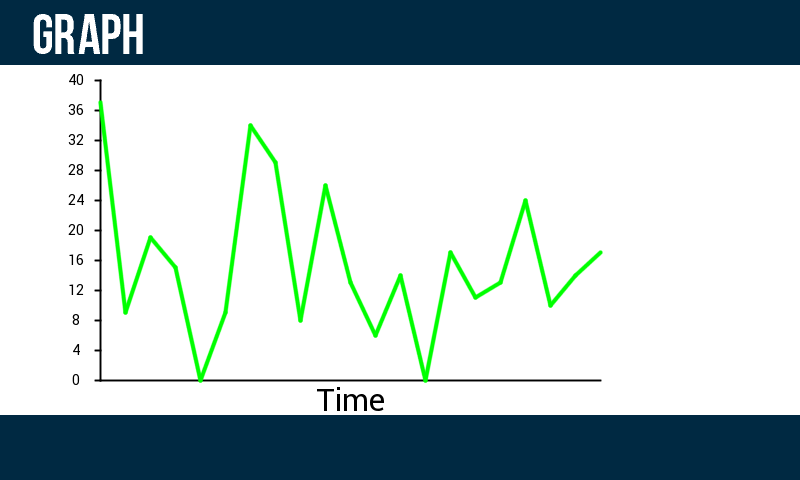
From here you can then add lines to your screens using the create_Line_object function. This allows you to create a line object that has a name that you can use to reference it, the amount of samples per line, thickness and colour.
MyGraphScreen.create_Line_object('Line1', 20, 2, gui.RGB(0,255,0))
You can then add data to this line using the add_data_to_Line function for which you need your line name and the data.
MyGraphScreen.add_data_to_Line('Line1', 10) # adds the integer 10 to the line
The line will then automatically be scaled along with the graph and will move when the sample “scrolls” off the screen.
The below example shows Line1 with random data being displayed on the graph.
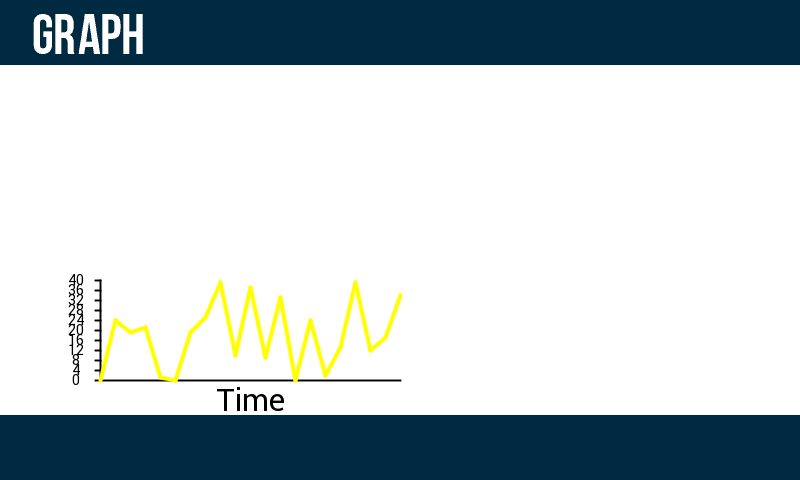
This example resizes graph and changes the colour of the line to be yellow.
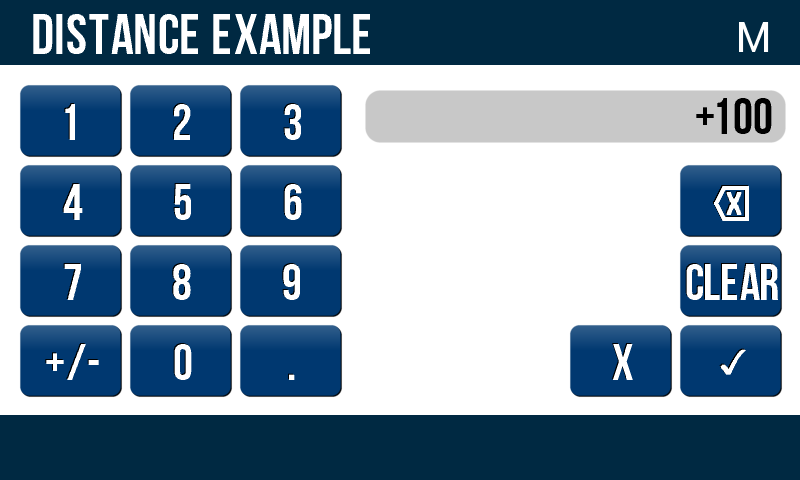
Screen Value
This is a custom screen. It is used for getting user input values. The screen looks like this:
Instead of inheriting from this screen you use its configure function. This means you simply add it to the ScreenManager as you would with any other Screen object:
ScreenManager.Add_Screen(ScreenValue(), 'SET_VALUE')
To then configure it:
ScreenManager.Screens['SET_VALUE'].configure(
    init_val, confirm_func, exit_func,
    minimum_confirm_val, maximum_confirm_val,
    decimal_points, title, unit_title
)
Configure:
init_val[float/int] = The initial value that should be being displayed. This is usually taken from the current value of whatever you are setting.
confirm_func[func] = The function for it to return to after having the tick button pressed. Only works whilst it has a valid value.
exit_func[func] = The function for it to return to after having the X button pressed.
minimum_confirm_val[float/int] = The minimum valid value that the user needs to enter to be able to press the tick.
maximum_confirm_val[float/int] = The maximum valid value that the user can enter to be able to press the tick.
decimal_points[int] = The maximum amount of decimal points that the user is allowed to enter. Defaults to 1.
title[str] = The title of the Screen Value to tell the user what they are setting. Defaults to a blank string.
unit_title[str] = The unit that that is being set, creates a smaller title in the top right corner. Defaults to a blank string.
ok_picture_button[picture_button object] = The picture button that will appear instead of the OK text. Defaults to None.
exit_picture_button[picture_button object] = The picture button that will appear instead of the EXIT text. Defaults to None.